For this project we were tasked with creating a ambience loop and 8 spot effects for a game theme of your own choice, my choice was a slightly suspenseful, futuristic, sci-fi game with a retro 16 bit like vibe to it. Set on an abandoned space station in deep space. All of these games had a lot of similar sounds in them, these were mainly mechanical sounds of machines and vehicles so lots of clanging metal, beeping and electrical sounds. So these were the main types of sounds that I wanted to work with in my own ambience.
For the research I looked at the sounds of existing games that had a similar theme to my idea, I looked into Elite Dangerous for busy space stations, Dead Space 3 and Alien:Isolation for tense, suspenseful and more claustrophobic atmosphere. They helped me to expand my ideas for what I was going to create. I liked how all the different sounds linked together well and helped to make the game feel whole. Like in Dead Space where they have added a lot of echo to most of the sounds to help show how empty the space station is and it adds to the sense of being all alone in a unfamiliar place. They have got the volume of all the sounds right, so that you can easily distinguish between all the different sounds, yet still clearly hear the characters when they are talking to each other. In Alien:Isolation they make the sounds of the Alien more distinct than the rest of the sounds, this helps to make the game more tense, as the sounds of the Alien are so different to the rest of the sounds in the game, with most of the other sounds being the prominent. In this game I also like how the background music drastically changes based on what the scenario is, it is more tense with more bass when the Alien is near you and more chilled out when you are safe.
For the recording of the sounds I used my phone recorder for the majority of the sounds when not in college and when in college I used a H4 recorder for the sounds which needed to sound clearer. I only downloaded one sound from the internet which was an explosion sound which I edited to make my own using volume, EQ and reverb for depth cueing. I edited the sounds by first getting rid of any unwanted frequencies and then changing the EQ, volume and adding reverb to get the right sound for my ambience. The best sound to record was a electrical spark sound as I used a sparkler I bought to record it to make it more fun to record and to try and make it more realistic sounding. When all the sounds were in place I self looped it so it would play right when looped over. For a few of the sounds I reused the original recording but changed it to sound like different things to help save some time to do things. Some of the things that I recorded to get sounds were; a car engine to make a machine starting sound, toilet flush to make a water pipe rushing sound, dropping different items on the floor one of these things were fun snaps which are tiny paper bags that are full of tiny stones and a small bit of gunpowder that make a banging sound when thrown on the floor I used this sound to make the sound of a gun firing, air con unit for background noise and a computer starting up for machine functions. For the laser gun sound I used the create frequency in Adobe Audition and edited the EQ, and reverb to make it sound more futuristic. For the robot warning speech I used the generate speech function in Adobe Audition, with the flanger feature to make it sound even more robotic by slightly changing the delay adding phasing of the sound signals.
The software we used to make the ambience was mainly Logic Pro, but we also used Adobe Audition for some things, I wish that we only used Audition as Logic Pro is not available on Windows, so I was unable to much at home which would have helped me to make more improvements to my ambience and spot effects by having more time to fine tune things like the reverb, EQ and volume. This would have helped to improve the depth cueing of my effects like the laser gun, beeping machine and explosion. I liked learning some of the skills in using the different software; changing the EQ with the space designer, making the volume and reverb change automatically in Logic and in Adobe Audition using the spectral frequency display. This all helped to broaden my knowledge of both programs and how to depth cue efficiently.
I think that I managed my time well for the amount of time we had, like I said before it would have been easier if I was able to do more at home. I kept all of the files in a folder called Assignment 1: Sound, I then had three more folders, one for spot effect files, one for anything to do with the ambience loop and the last one for the original recordings of sounds. Most of my sound files were saved as WAVs, or MP3s. These folders I kept all on my Google drive so that I could access them easily from both home and college.
I would say that the ambience I made was changed from what I initially expected, it was less tense and suspenseful than I thought I might of made it as I was thinking of more of a horror sounding ambience, but I decided against this as I knew it would suit a wider audience if it was not too suspenseful or claustrophobic. I think that the background keyboard tune could of been improved to make it sound more professional and less out of place than it does, but I do not have that much experience with music software, so it took me a while to figure out how to use a lot of the features correctly, like the space designer and the EQ tools. I think that I could have made some of the sounds more distinguishable from each other and made them go together slightly better. For example I think that I could have made the gunshots sound slightly more realistic with more of a echo coming off of the shots and maybe making some of the shots sound both closer up and further away to add to the depth cueing. I also think that I could have improved the electrical sparks by making them sound more distinct, adding more sparks throughout the ambience and working a bit more with the depth cueing of them.
Overall I enjoyed this project as it was quite different to any other projects that we have done so far. Some of it could have been improved, like the depth cueing of close up sounds like the gunshots, electrical sparks and the robotic voice, also some of the more distant sounds including the explosion and the more far away sounding gunshots furthermore like I said about the background tune being improved to sound more professional but all together I was pleased with what I accomplished for the project.


_(Earth-616)_from_All-New_X-Men_Vol_1_13")


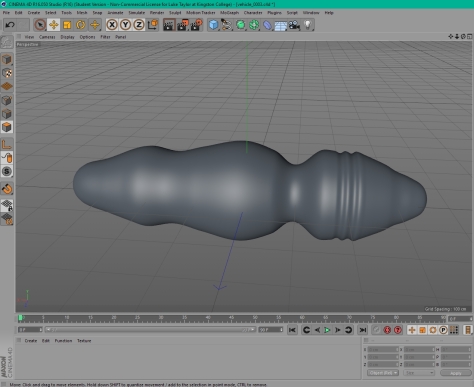


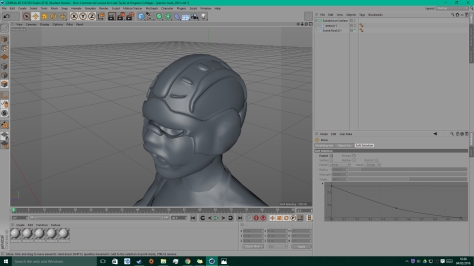
 First I selected a area for one part of the armour, I then copied it, inverted the selection and deleted the parts that I did not need. After that I just used different tools to make the selections into armour parts, the main tools that I used were; extrude, inner extrude, smooth shift and matrix extrude.